January 7, 2011

Google Body Browser

Note: Google Body is now Zygote Body 6/01/12

Google has released a new 3-D tool, the Google Body Browser! The Google Body Browser allows users to explore the human body similarly to how users can explore the world in Google Earth. The only way to access the Google Body Browser is by using a Web-GL enabled browser like Google Chrome 9 Beta or Firefox 4 beta. Web-GL brings 3D to the web without needing a plug-in.

This Google Labs project gives users the ability to rotate a virtual body, peel back layers of the body, as well as zoom in an out of various parts and systems within the body.

November 19, 2010

The Educational Value of Google Forms

Recently a teacher asked me for a program recommendation that would allow students to create a survey or a quiz while also providing immediate feedback. The teacher also wanted to be able to embed the surveys/quizzes on a class wiki.

For this project I suggested the use of Google Forms. The great thing about Google Forms is that you can see the results of your survey/quiz in real time. The results are automatically compiled in a Google spreadsheet.

Below is an example of a Course Evaluation created with Google Forms. You will also see the results of the evaluation in the spreadsheet below. Go ahead and fill out the evaluation form to see the results in real time.

If you are interested in trying this out for yourself the Innovative Educator blog has a great post on using Google Forms. There are step-by-step directions available.


October 29, 2010

MassCUE Reflections

This year's MassCUE conference was a very enjoyable day. It was great to be able to reconnect with past colleagues as well as meet many new individuals. It was great to talk with administrators, teachers, technology coordinators, and more. Some of the highlights for me were:
  • Robin Talkowski, Rachel Fawson and Alison Breaux shared some great Language Arts resources to use with middle school students - I'll be sure to check out Storybird and Tikatok to create online books.
  • I was also able to learn more about the advanced features of Diigo. I would like to use the "Teacher Console" more with teachers and students. Having access to a teacher account in Diigo is a real benefit. Diigo has certainly helped me transform my bookmarking practices.
  • Mary Beth Bergh and Susannah Remillard really made podcasting come alive with their Mystery Theater Podcasts. They even had everyone participate during the session. Mary Beth has documented the whole project on her blog.

October 11, 2010

Which technology tool should I use?

Too often teachers and students are faced with the question "Which technology tool is the best option for the project I'm working on?" In the schools I work in, this question often surfaces when students begin to work on multimedia projects. I often explain to both teachers and students that it isn't as much about the tool as is the learning outcome.

For example when completing a multimedia presentation teachers and students are presented with endless options. Here are just a few:
The list of available resources can be daunting. For older students I often suggest teachers give students a choice of tools. Students with different learning styles will often gravitate toward different tools. Also, in some cases students will have a personal preference for a tool that they feel confident in using. In the end it is really about choosing the tool that is going to best support student learning objectives.

Another point to keep in mind is that some programs are Mac specific and some are PC specific. If a teacher would like to avoid this conflict all together they can choose a "cloud-based" program like Animoto or 280 Slides. Choosing a cloud-based program also allows students the option of continuing work on their project from home (as long as they have an Internet connection).

If teachers have the luxury to pick from several tools it is also important to acknowledge that each tool has its strengths and weaknesses. Some are great for group collaboration, while others are better suited for the individual contributor. Some are feature rich, while others have a limited tool set. In the end there really is something for everyone. Just remember it should always be about the learning experience!

September 18, 2010

Fun with Blabberize

Blabberize is a clever way to have fun with photos. Users define where a mouth should be on their photo. Next, the user adds audio. The mouth then moves with the user's voice. Finished projects can easily be embedded on a website, wiki, blog, or simply by sharing the URL.

Students could use Blabberize to tell a story through the mouth of a historical figure, debate as a politician, narrate a poem, and so much more!

Here's my first attempt at using Blabberize.

September 17, 2010

A great collection of Web 2.0 Tools

Discovery Education released a "Web 2.0 Challenge" document that includes a collection of educational Web 2.0 tools that can be used across the curriculum. The goal is to get teachers and students to try some new Web 2.0 tools. Each page of the document includes a new tool with suggestions for use within the classroom. Also check out the additional tools listed in the Classroom Resources section of the Discovery site.

Discovery Web 2.0 Challenge

September 10, 2010

21st Century Skills

I enjoyed reading the article "Who needs 21st Century Skills Anyway?" by Greg Limperis. Check it out!

edtech_limperis_21stcskills

September 5, 2010

Using the Google Gadgets Editor

Recently I tried to add a Google Reader blog bundle gadget to my website which is hosted by Google Sites.  I tried many times to use the "Embed gadget" to embed the bundle in my site. I thought this would be a pretty painless process because normally it only requires copying and pasting the embed code. With Google Sites this wasn't the case. After several failed attempts to embed my gadget, I did some searching on the web to see what I could find. It appears that Google Sites offers minimal support for JavaScript based gadgets.

I found a great "how to" article that gave me the steps to add JavaScript Contents to Google Sites with the Google Gadget Editor.

Here are the directions I followed to insert my blog bundle gadget into Google Sites using the Gadget Editor:

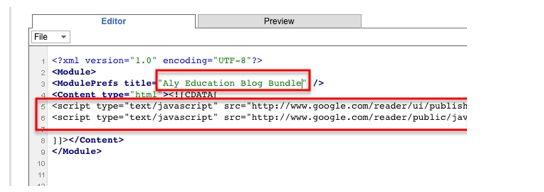
1. Navigate to the Gadget Editor. Scroll down to the bottom of the page to the live editor and replace "Hello World!" script with embed code from custom gadget (e.g. GR blog bundle) - example below

Shows Hello World! sript


Shows Hello World! script replaced with my JavaScript


2.  Next choose File, Save As and name the xml file


3. Click on the new xml file to access the new url.


4. Go to Google Sites and choose to add gadget by URL.


5. Now your JavaScript based gadget should appear on your page.